今天不太舒服,在家請假了一天。突然想起最近因為一些小問題,看了下關於容器中 UID 的東西。所以簡單來聊聊這方面的東西。算個新手向的文章
開篇#
最近幫 FrostMing 把他的 tokei-pie-cooker 部署到我的 K8S 上做成一個 SaaS 服務。Frost 最開始給我了一個鏡像地址。然後我啪的一下複製粘貼了一個 Deployment 出來
apiVersion: apps/v1
kind: Deployment
metadata:
  name: tokei-pie
  namespace: tokei-pie
  labels:
    app: tokei-pie
spec:
  replicas: 12
  selector:
    matchLabels:
      app: tokei-pie
  template:
    metadata:
      labels:
        app: tokei-pie
    spec:
      containers:
      - name: tokei-pie
        image: frostming/tokei-pie-cooker:latest
        imagePullPolicy: Always
        resources:
          limits:
            cpu: "1"
            memory: "2Gi"
            ephemeral-storage: "3Gi"
          requests:
            cpu: "500m"
            memory: "500Mi"
            ephemeral-storage: "1Gi"
        securityContext:
          allowPrivilegeEscalation: false
          runAsNonRoot: true
啪的一下,很快嘛,很簡單對吧,限制下 Storage 用量,限制一下 NonRoot ,以免我被人打穿。Fine,kubectl apply -f 一下。Ops,
Error: container has runAsNonRoot and image has non-numeric user (tokei), cannot verify user is non-root (pod: "tokei-pie-6c6fd5cb84-s4bz7_tokei-pie(239057ea-fe47-40a9-8041-966c65344a44)", container: tokei-pie)
噢,被 K8$ 攔截了,攔截點在 pkg/kubelet/kuberruntime/security_context_others.go 中。
func verifyRunAsNonRoot(pod *v1.Pod, container *v1.Container, uid *int64, username string) error {
	effectiveSc := securitycontext.DetermineEffectiveSecurityContext(pod, container)
	// If the option is not set, or if running as root is allowed, return nil.
	if effectiveSc == nil || effectiveSc.RunAsNonRoot == nil || !*effectiveSc.RunAsNonRoot {
		return nil
	}

	if effectiveSc.RunAsUser != nil {
		if *effectiveSc.RunAsUser == 0 {
			return fmt.Errorf("container's runAsUser breaks non-root policy (pod: %q, container: %s)", format.Pod(pod), container.Name)
		}
		return nil
	}

	switch {
	case uid != nil && *uid == 0:
		return fmt.Errorf("container has runAsNonRoot and image will run as root (pod: %q, container: %s)", format.Pod(pod), container.Name)
	case uid == nil && len(username) > 0:
		return fmt.Errorf("container has runAsNonRoot and image has non-numeric user (%s), cannot verify user is non-root (pod: %q, container: %s)", username, format.Pod(pod), container.Name)
	default:
		return nil
	}
}
簡而言之,K8$ 先會從鏡像的 manifact 中拿鏡像的 Runing Username. 如果你鏡像裡有設定 Runing Username 且你設定了 runAsNoneRoot ,同時你沒設定 Run uid,那麼會報錯。Make Sense,如果你指定的用戶名的 uid 是 0,那麼實際上還是打穿了 SecurityContext 的限制
找 Frost 要了下他的 Dockerfile,如下
FROM python:3.10-slim

RUN useradd -m tokei
USER tokei

WORKDIR /app
COPY requirements.txt .
RUN pip install -r requirements.txt

COPY templates /app/templates
COPY app.py .
COPY gunicorn_config.py .

ENV PATH="/home/tokei/.local/bin:$PATH"
EXPOSE 8000
CMD ["gunicorn", "-c", "gunicorn_config.py"]
OK, 平平淡淡,沒有異常。OK,那我啪的一下改了 Deployment,新版如下
apiVersion: apps/v1
kind: Deployment
metadata:
  name: tokei-pie
  namespace: tokei-pie
  labels:
    app: tokei-pie
spec:
  replicas: 12
  selector:
    matchLabels:
      app: tokei-pie
  template:
    metadata:
      labels:
        app: tokei-pie
    spec:
      containers:
      - name: tokei-pie
        image: frostming/tokei-pie-cooker:latest
        imagePullPolicy: Always
        resources:
          limits:
            cpu: "1"
            memory: "2Gi"
            ephemeral-storage: "3Gi"
          requests:
            cpu: "500m"
            memory: "500Mi"
            ephemeral-storage: "1Gi"
        securityContext:
          allowPrivilegeEscalation: false
          runAsNonRoot: true
          runAsUser: 10086
這裡選了我自己的 Magic Number, 10086,這下總沒問題了吧,我又 duang 的一下執行了 kubectl apply -f。Oooops,船新的報錯
/usr/local/bin/python: can't open file '/home/tokei/.local/bin/gunicorn': [Errno 13] Permission denied
OK,那我拋弃我的 Magic Number,換成傳說中的數字,1000 來看一下。OK,Works!
那麼這一切到底是為什麼呢?那麼接下來小編會來告訴你(XD
簡單的介紹,完整的快樂#
容器中的 UID#
首先講一點前置的知識。首先在 Linux 中的 UID 分配規律。首先在一個 Linux UserNamespace 中,UID 默認的範圍是從 0 - 60000。其中 UID 0 是 Root 的保留 UID。從理論上來講,用戶 UID/GID 的創建的範圍是從 1 到 60000
但是實際上可能會更複雜一些,通常各發行版的內置的一些服務,可能會自帶一些特殊的用戶,比如經典的 www-data (之前沒事喜歡搭博客的同學對這個肯定不陌生)。所以實踐中,一個 User Namespace 內,一個 UID 的起始,通常是 500 或者 1000。具體的設置,取決於一個特殊文件的設置,login.defs,路徑是 /etc/login.defs
官方文檔中描述如下:
Range of user IDs used for the creation of regular users by useradd or newusers. The default value for UID_MIN (resp. UID_MAX) is 1000 (resp. 60000).
在我們調用 useradd 來在構建 Dockerfile 時添加用戶。這個時候,在相關操作執行完畢後,會在 /etc/passwd 這個特殊文件中添加對應的用戶信息。以 Frost 的 Dockerfile 為例,最終的 passwd 文件內容如下
root:x:0:0:root:/root:/bin/bash
daemon:x:1:1:daemon:/usr/sbin:/usr/sbin/nologin
bin:x:2:2:bin:/bin:/usr/sbin/nologin
sys:x:3:3:sys:/dev:/usr/sbin/nologin
sync:x:4:65534:sync:/bin:/bin/sync
games:x:5:60:games:/usr/games:/usr/sbin/nologin
man:x:6:12:man:/var/cache/man:/usr/sbin/nologin
lp:x:7:7:lp:/var/spool/lpd:/usr/sbin/nologin
mail:x:8:8:mail:/var/mail:/usr/sbin/nologin
news:x:9:9:news:/var/spool/news:/usr/sbin/nologin
uucp:x:10:10:uucp:/var/spool/uucp:/usr/sbin/nologin
proxy:x:13:13:proxy:/bin:/usr/sbin/nologin
www-data:x:33:33:www-data:/var/www:/usr/sbin/nologin
backup:x:34:34:backup:/var/backups:/usr/sbin/nologin
list:x:38:38:Mailing List Manager:/var/list:/usr/sbin/nologin
irc:x:39:39:ircd:/run/ircd:/usr/sbin/nologin
gnats:x:41:41:Gnats Bug-Reporting System (admin):/var/lib/gnats:/usr/sbin/nologin
nobody:x:65534:65534:nobody:/nonexistent:/usr/sbin/nologin
_apt:x:100:65534::/nonexistent:/usr/sbin/nologin
tokei:x:1000:1000::/home/tokei:/bin/sh
那麼構建文件結束後,我們來看一下我們常見的容器運行時之一的 Docker 對此相關的處理。
這裡還要科普一點前置的知識,現在 Docker 實際上只能算一個 Daemon+CLI,它核心的功能是調用其背後的 containerd。而 containerd 最終通過 runc 來創建相關的容器
那我們這裡看一下 runc 對此相關的處理
在 runc 創建容器的時候,會調用 runc/libcontainer/init_linux.go.finalizeNamespace 這個函數完成一些設置,而在這個函數中,會調用 runc/libcontainer/init_linux.go.setupUser 這個函數來完成 Exec User 的設置,我們來看下源碼
func setupUser(config *initConfig) error {
	// Set up defaults.
	defaultExecUser := user.ExecUser{
		Uid:  0,
		Gid:  0,
		Home: "/",
	}

	passwdPath, err := user.GetPasswdPath()
	if err != nil {
		return err
	}

	groupPath, err := user.GetGroupPath()
	if err != nil {
		return err
	}

	execUser, err := user.GetExecUserPath(config.User, &defaultExecUser, passwdPath, groupPath)
	if err != nil {
		return err
	}

	var addGroups []int
	if len(config.AdditionalGroups) > 0 {
		addGroups, err = user.GetAdditionalGroupsPath(config.AdditionalGroups, groupPath)
		if err != nil {
			return err
		}
	}

	// Rather than just erroring out later in setuid(2) and setgid(2), check
	// that the user is mapped here.
	if _, err := config.Config.HostUID(execUser.Uid); err != nil {
		return errors.New("cannot set uid to unmapped user in user namespace")
	}
	if _, err := config.Config.HostGID(execUser.Gid); err != nil {
		return errors.New("cannot set gid to unmapped user in user namespace")
	}

	if config.RootlessEUID {
		// We cannot set any additional groups in a rootless container and thus
		// we bail if the user asked us to do so. TODO: We currently can't do
		// this check earlier, but if libcontainer.Process.User was typesafe
		// this might work.
		if len(addGroups) > 0 {
			return errors.New("cannot set any additional groups in a rootless container")
		}
	}

	// Before we change to the container's user make sure that the processes
	// STDIO is correctly owned by the user that we are switching to.
	if err := fixStdioPermissions(config, execUser); err != nil {
		return err
	}

	setgroups, err := ioutil.ReadFile("/proc/self/setgroups")
	if err != nil && !os.IsNotExist(err) {
		return err
	}

	// This isn't allowed in an unprivileged user namespace since Linux 3.19.
	// There's nothing we can do about /etc/group entries, so we silently
	// ignore setting groups here (since the user didn't explicitly ask us to
	// set the group).
	allowSupGroups := !config.RootlessEUID && string(bytes.TrimSpace(setgroups)) != "deny"

	if allowSupGroups {
		suppGroups := append(execUser.Sgids, addGroups...)
		if err := unix.Setgroups(suppGroups); err != nil {
			return err
		}
	}

	if err := system.Setgid(execUser.Gid); err != nil {
		return err
	}
	if err := system.Setuid(execUser.Uid); err != nil {
		return err
	}

	// if we didn't get HOME already, set it based on the user's HOME
	if envHome := os.Getenv("HOME"); envHome == "" {
		if err := os.Setenv("HOME", execUser.Home); err != nil {
			return err
		}
	}
	return nil
}
大家看注釋應該差不多能理解這段代碼在幹啥,在這段代碼將會調用 runc/libcontainer/user/user.go.GetExecUserPath 和 runc/libcontainer/user/user.go.GetExecUser 來獲取 exec 時的 UID,我們來看一下這塊的實現(下面代碼我精簡了一部(
func GetExecUser(userSpec string, defaults *ExecUser, passwd, group io.Reader) (*ExecUser, error) {
	if defaults == nil {
		defaults = new(ExecUser)
	}

	// Copy over defaults.
	user := &ExecUser{
		Uid:   defaults.Uid,
		Gid:   defaults.Gid,
		Sgids: defaults.Sgids,
		Home:  defaults.Home,
	}

	// Sgids slice *cannot* be nil.
	if user.Sgids == nil {
		user.Sgids = []int{}
	}

	// Allow for userArg to have either "user" syntax, or optionally "user:group" syntax
	var userArg, groupArg string
	parseLine([]byte(userSpec), &userArg, &groupArg)

	// Convert userArg and groupArg to be numeric, so we don't have to execute
	// Atoi *twice* for each iteration over lines.
	uidArg, uidErr := strconv.Atoi(userArg)
	gidArg, gidErr := strconv.Atoi(groupArg)

	// Find the matching user.
	users, err := ParsePasswdFilter(passwd, func(u User) bool {
		if userArg == "" {
			// Default to current state of the user.
			return u.Uid == user.Uid
		}

		if uidErr == nil {
			// If the userArg is numeric, always treat it as a UID.
			return uidArg == u.Uid
		}

		return u.Name == userArg
	})

    if err != nil && passwd != nil {
		if userArg == "" {
			userArg = strconv.Itoa(user.Uid)
		}
		return nil, fmt.Errorf("unable to find user %s: %v", userArg, err)
	}

	var matchedUserName string
	if len(users) > 0 {
		// First match wins, even if there's more than one matching entry.
		matchedUserName = users[0].Name
		user.Uid = users[0].Uid
		user.Gid = users[0].Gid
		user.Home = users[0].Home
	} else if userArg != "" {
		// If we can't find a user with the given username, the only other valid
		// option is if it's a numeric username with no associated entry in passwd.

		if uidErr != nil {
			// Not numeric.
			return nil, fmt.Errorf("unable to find user %s: %v", userArg, ErrNoPasswdEntries)
		}
		user.Uid = uidArg

		// Must be inside valid uid range.
		if user.Uid < minID || user.Uid > maxID {
			return nil, ErrRange
		}

		// Okay, so it's numeric. We can just roll with this.
	}
}
這裡看著很複雜,實際上總結下來就這樣
-
首先從
/etc/passwd讀取已知的所有的用戶 -
如果用戶啟動時傳入的是用戶名,那麼判斷是否有用戶名和啟動參數傳入的相等,沒有則啟動失敗
-
如果用戶啟動傳入的是 UID,那麼如果在已知用戶中有對應的用戶,那麼設置為該用戶。如果沒有,則將進程的 UID 設置為傳入的 UID
-
如果用戶什麼都沒傳入,那麼以
/etc/passwd中第一個用戶來作為 exec 用戶。默認情況下第一個用戶通常是指 UID 為 0 的 root 用戶。
OK 那麼回到我們的 Deployment 中,那我們不難得出如下的結論
-
如果我們沒有設置 runAsUser ,且鏡像裡也沒指定啟動用戶,那麼我們容器中的進程將以當前 user namespace 中 uid 為 0 的 root 用戶啟動
-
如果在 Dockerfile 中設定了啟動時的用戶,且沒有設置 runAsUser,那麼將以我們在 Dockerfile 中的用戶啟動
-
如果我們設置了 runAsUser 且 Dockerfile 中也指定了相關的用戶,那麼將以 runAsUser 所指定的 UID 啟動進程
OK 那麼,到這裡看似問題解決了。但是這裡有個新的疑問。通常來說,我們創建文件之類的操作,默認的權限都是 755 ,即對於非當前用戶,也非當前用戶組內的成員,有可讀可執行權限。按道理說不應該出現前文所說的 [Errno 13] Permission denied 情況。
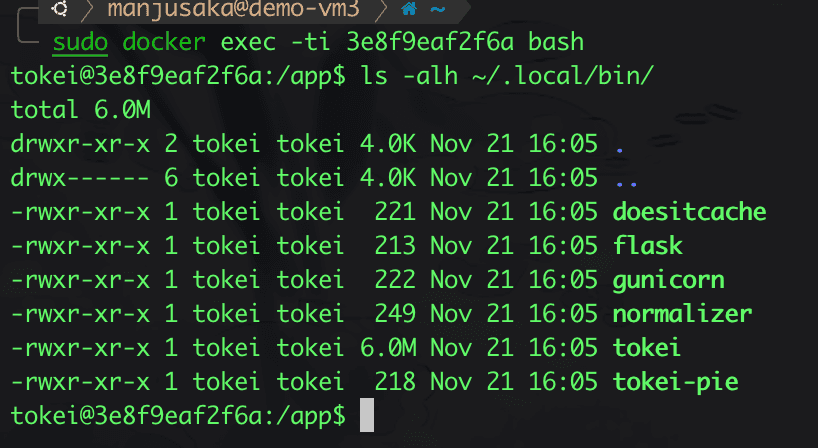
我進容器看了下報錯的文件,的確也和我估計的一樣,是 755 權限

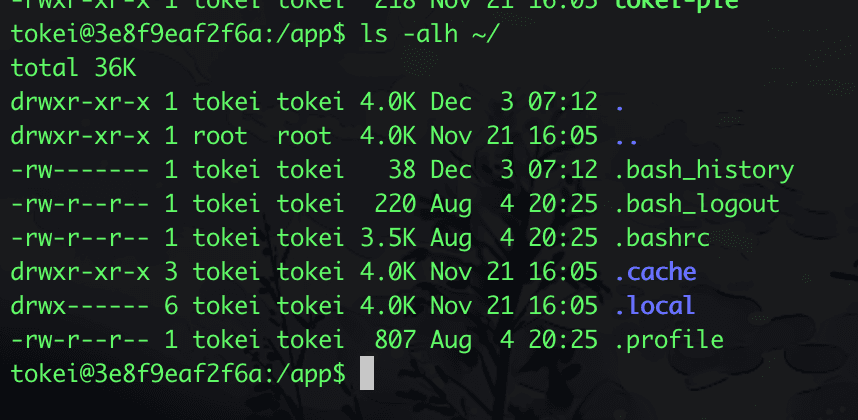
那麼問題出在哪呢?問題出在 ~/.local/ 這個文件夾,

是的沒錯,這裡的 .local 是 700 權限,即對於非當前用戶,也非當前用戶組內的成員,沒有對當前目錄的可執行權限。這裡大家可能有點迷惑,目錄的可執行權限是什麼?這裡引用下官方文檔 Understanding Linux File Permissions 中的描述
execute – The Execute permission affects a user’s capability to execute a file or view the contents of a directory.
OK,好吧,如果沒有對應的目錄的可執行權限,那麼我們也沒法執行該目錄裡的文件,即便我們有文件的可執行權限。
而我這裡翻了一下 pip 的源碼。發現 pip 在用戶態安裝的時候,如果不存在 .local 目錄,那麼會創建 .local 目錄並將權限設置為 700。
OK 到這裡我們的整個問題的因果鏈就已經完全建立了
在 dockerfile 中創建並設置用戶 tokei,uid 1000 -> pip 創建了 700 的 .local, .local 归属 UID 1000 的用戶 -> 我們 runAsUser 設置為 非 1000 的數字 -> 無 .local 的可執行權限 -> 報錯
說實話,我能理解 pip 為什麼這麼設計,但是我覺得這樣的設計是有一點 broke 了一些約定俗成的規矩的,其合理性有待商榷
總結#
這個問題其實不算難查,但是發生的位置是我有點沒有想到的,從我的角度來看,歸根結底還是在與 pip 不遵守基本法造成的 23333
這裡留個題目大家有興趣可以思考下。我們都知道 Docker 有個命令是 docker cp 是從宿主機往運行的容器中拷貝文件 / 從容器中往宿主機中拷貝文件。有個參數是 -a ,即保留原文件的 UID/GID,那麼如果我們用這個參數從宿主機 / 容器往容器 / 宿主機中拷貝文件,那麼我們 ls -lh 時,可以看到怎樣的 User/UserGroup 信息。
OK,這篇水文就先寫到這裡,寫水文真快樂。週末要是有時間的話,可以再寫個水文簡單聊聊一個關於最近遇到的一個很有趣的根據特徵封鎖 SSL 流量的手法分析
好了,溜了溜了